It was mayhem this weekend with multiple Halloween parties (for the boys and Em), a dance (for Kyle), and a birthday party (for Liam). I'm partied out and it isn't even Halloween yet.
I bought Candy Melts and made some very cute mummy cookies (found at How Does She via Pinterest). They are so easy! All you need is Oreos, white candy melts, a ribbon tip and piping bag, and googly candy eyes.
And then after all the parties, my friend Karie came over and we made more mummy cookies and chocolate dipped pretzel sticks until 11:30 Friday night.
We also made sugar cookies (check out this awesome recipe at Mel's Kitchen) and decorated them with the kids. So fun!
I forgot to take a picture of the table before the kids decimated it, but here it is after they started eating. I used Wilton's Sparkly Gel Icing for the spiderweb cupcakes.
Sunday, October 30, 2011
Sunday, June 12, 2011
Upstairs
In case you haven't read my entire blog from the beginning, the reason we did this crazy renovation was because we wanted our main living space to be on the ground floor, and we wanted five bedrooms upstairs. That meant we planned to flip our layout, moving our kitchen, living room and dining room from upstairs to down.
Hence, the clever name of my blog - the Upside Down Home. Get it?
The upstairs kitchen would become the fourth bedroom, the dining room would become the fifth bedroom, the living room would become a family room.
You can read about the strange phenomenon that is the BC Basement Entry here.
As I am writing these posts I'm realizing what a bad blogger I am - I have terrible before shots. As in, no before shots. You're going to have to make do with random family pictures that show a little of the room behind. And a lot of my in-progress pictures were taken on my iPhone - I'm warning you now.
Here is the upstairs living room. Post reno it will be the kids' hang-out room where they can numb their minds on video games and Nickelodeon. You can see the railing for the staircase behind the couch on the right - post reno the stairs will come up at the far right of the picture where that lamp is.
Here's the old kitchen in all its former glory:
Framing & Demo
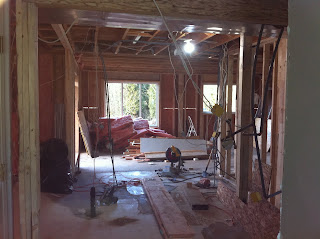
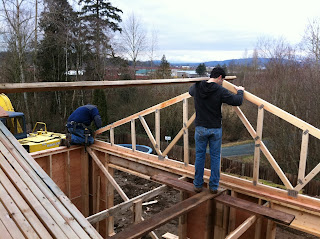
Once the foundation was done, we moved into the framing phase. It went pretty quickly and it was exciting to see our plans come to life. I had walked through these rooms in my head for the past year - really walking through them was a bit surreal.
The trusses were delivered and went up very quickly:
... at the same time the old, upstairs kitchen was demolished and the super sexy orange oak cabinets were taken away to my plumber's workshop.
The old kitchen would eventually become my oldest son's bedroom.
The stairs were removed and the new staircase was 180'd. The new stairs stayed in the same location/corridor as the old ones, but they were rebuilt in the opposite direction. This picture was taken from what was the top of the landing of the old staircase.
Excuse the blurry iPhone photos.
 |
| Looking from foyer through the kids desk area and beyond to the dining room |
... at the same time the old, upstairs kitchen was demolished and the super sexy orange oak cabinets were taken away to my plumber's workshop.
The old kitchen would eventually become my oldest son's bedroom.
The stairs were removed and the new staircase was 180'd. The new stairs stayed in the same location/corridor as the old ones, but they were rebuilt in the opposite direction. This picture was taken from what was the top of the landing of the old staircase.
Excuse the blurry iPhone photos.
Labels:
Construction
Well, it's done but you're not going to see it just yet
First of all, I should say that the reno process was arduous, long, and frustrating. I had the best of intentions to blog these amazing posts throughout my reno, a la DIY Diva, but truthfully I began to loathe the process so much that the last thing I wanted to do was blog about it.
I know, I'm a sissy.
Anyway, now it's June and we've been back in the house for four weeks now and I'm finally emotionally ready to blog about what was, without a doubt, one of the most stressful periods of my life. I wonder if it had anything to do with the fact we went massively over budget and bought a restaurant at the same time as we were renovating? Or maybe it was the fact that we were trying to do it while not sucking as parents to our four kids? You know you're renovating when you feed your kids at the Subway at the front of Home Depot three times in one week.
So, stay tuned for a retrospective of sorts as I get you up to speed so that I can post some {long overdue} reveals.
Wednesday, March 16, 2011
And then the wind and hail came ...
... and down came the tarp that had been rigged to protect the slab. Which freaked me out when I found out, but turned out not to be a problem at all. I wasn't home when it happened, but my two oldest gamely went outside and tried to fix it - by themselves.
When I got home, we took the posts down and used the wood to secure the tarp.
When I got home, we took the posts down and used the wood to secure the tarp.
Labels:
Construction
Tuesday, March 15, 2011
Foundation Pour
In January, we finally got to the stage where we could pour the slab. We live on the Westcoast which necessitated erecting a large tarp over the slab to protect it from the incessant rain.


It was exciting to make progress ... finally. By this point, we were already four months into it. I'm not the most patient person so it was good to be able to get on with it.
Labels:
Construction
Pouring Footings
Once the forms were built, the race was on to get the footings poured before a) the snow came and b) our contractor went to Australia for three weeks.
We didn't beat the snow and there were times when it looked like we wouldn't make the deadline before Joe left for sunnier climes, but it all came together in the end.
After the footings are poured, that rebar will get bent over into the middle of the slab, and more concrete will be poured into the middle where my husband is standing in the picture above.
This was the very end of November, and then pretty much nothing happened until January...
Labels:
Construction
Sunday, March 13, 2011
The Land Bridge
We decided to do it. We weighed our options and realized that it was worth it to us to go ahead with our plans, even if it meant added cost. We figured that we were still way ahead of where we would be if we built new or moved to another house (that is, if we could find one that would offer everything this one would when it was done).
In the end it meant drilling six micro-piles. Our engineer came up with an elaborate plan. Some would say (and have said) he went overboard but I guess better safe than sorry?
It delayed us by about six weeks and blew our entire contingency fund right out of the gate, but we kept telling ourselves that it would be worth it in the end.
As we aren't actually at the end yet, time will tell if that's the case.
But I'm keeping my fingers crossed.
In the end it meant drilling six micro-piles. Our engineer came up with an elaborate plan. Some would say (and have said) he went overboard but I guess better safe than sorry?
Our contractor Joe said that the only time he has ever seen so much steel go into a structure was when he built a bridge.
.

It delayed us by about six weeks and blew our entire contingency fund right out of the gate, but we kept telling ourselves that it would be worth it in the end.
As we aren't actually at the end yet, time will tell if that's the case.
But I'm keeping my fingers crossed.
Labels:
Construction
A little {expensive} hiccup ...
Approval came back from the city within two weeks. We were surprised because they aren't known to move that quickly. The plans came back with the usual caveats, and a small note that we'd need a geotechnical engineering report.
No biggie - it would cost $1200 which was annoying, but we were excited to begin.
The excavator arrived at the beginning of November.
The deck had already been taken down, and all that remained was the concrete pad under the old deck. Our excavator, Jack, made quick work of the concrete.
Other than the fact that the digger went through the ground like it was butter, our first clue that we had a problem was when the pad was removed to reveal these piling caps.
Anyway, to make a long story short, our house was built on pilings. Which we had already known, but the full ramifications would become apparent over the next month as the costs began to mount.
Our geotechnical engineer wanted soil samples, so this interesting rig showed up in our backyard to drill down, revealing that we had insufficient structural fill that would not support our structure without some serious engineering assistance. The rest of the house was built on 31 pilings - so that wasn't going anywhere. But if we wanted to build we were going to have to go to some extraordinary lengths.
At this point, we had to decide whether to proceed or to abandon the renovation completely.
Labels:
Construction
Tearing Down the Deck
Our deck needed to go to make way for the ground floor addition. No matter, it was small and the stairs were so rickety the kids weren't allowed to use them.
Unfortunately, a beautiful and strange tree the kids call 'the weather tree' also had to go. They called it the weather tree because all you had to do was look at it to know what kind of weather we were having (?) It had the most remarkable, squiggly leaves - and I was very sad to have to cut it down.
We cut it down ourselves. Well, my guy did the cutting, and I pulled it down and away from the house (there was much squealing on my part, I'll admit).
 |
Labels:
demolition
New and Improved
After meeting our designer Jesse over the summer months, this is what we submitted in October 2010 to the city for approval:
The dining room and kitchen are an addition measuring approximately 12 feet by 21 feet. The new living room is where my husband's cave of an office used to be.
See that little office off the kitchen? That's going to be my office - some may think it a strange location, but I'm looking forward to being able to work there. Right now I work on the dining room table. Every time I have any work to do, I have to pull it all out, only to have to put it away when it's time to eat. That's how I spent the last two years of my business degree. It was a major pain, and not conducive to getting stuff done.
Bed 2 and Bed 3 are where our kitchen and dining room used to be, and the new Family Room is what used to be the old Living Room. The new plan gives us five bedrooms on one level.
 |
| More functional living space on the ground floor |
See that little office off the kitchen? That's going to be my office - some may think it a strange location, but I'm looking forward to being able to work there. Right now I work on the dining room table. Every time I have any work to do, I have to pull it all out, only to have to put it away when it's time to eat. That's how I spent the last two years of my business degree. It was a major pain, and not conducive to getting stuff done.
 | |||
| New and improved upstairs |
Bed 2 and Bed 3 are where our kitchen and dining room used to be, and the new Family Room is what used to be the old Living Room. The new plan gives us five bedrooms on one level.
Labels:
house plans,
layout
The Layout
We love our neighbourhood – we’re close to great schools, our kids have tons of friends on our street, we back onto one of the prettiest parks in the city, and we have an awesome view. Oh, and we have nothing but farmland behind us. It’s quiet and serene. Well, as quiet and serene as it gets with four kids and a beagle.
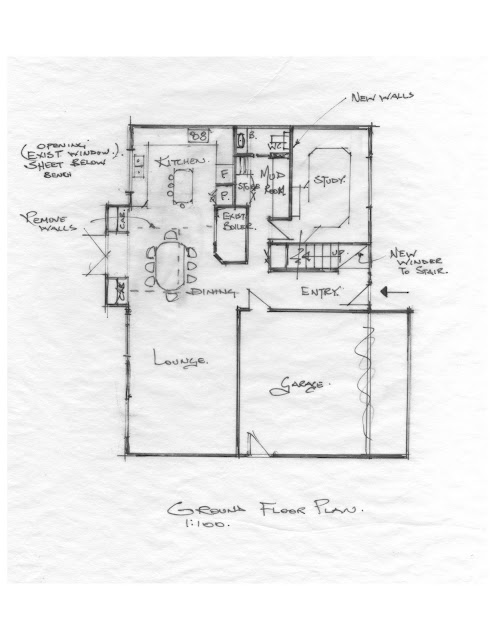
While the location was ideal, the layout was not. A few years ago, my dad and his wife visited us on their way home to Australia. My dad is a draftsman, and I talked to him about my renovation ideas. He went around and measured the house, and came up with some rough sketches that would involve adding a small bump out on the ground floor for a dining room. He knew we had a limited budget and this seemed like a pretty good compromise.
I explained in this post about our layout – how the kitchen, dining and living rooms are upstairs, along with three bedrooms. The ground floor is for some unexplained reason called ‘the basement’ even though it’s completely above ground. Dad’s plan called for moving all of our living space to the ground floor, and adding two bedrooms upstairs where the kitchen and dining room had been previously.
 |
| Dad's Plan for The Ground Floor aka 'The Basement' |
 |
| Upstairs |
For the next four years I dreamed about making our house more functional for our family. Over that time, Dad’s plan remained the basis for what was to come – we’ve stayed pretty true to what he suggested.
In the summer of 2010, we decided to take the plunge. We hired a designer to take Dad’s sketches and my plans, and make something we could take to the city for permits. Along the way, we decided to add some more square footage on the ground floor to give us a pantry, a couple of offices and more family space.
For more on our new house plans, click here.
For more on our new house plans, click here.
Labels:
layout
Friday, February 18, 2011
Our First House
In 2004 we had a very young family (our kids were between the ages of 9 and six months). We decided it was time to buy but because of Vancouver's sky-rocketing housing prices, we looked East and bought in the Fraser Valley. We bought one of the first houses we saw, mainly because we could afford it, mostly because it was on the side of town that I liked. But not knowing much about the area, we ended up buying on one of the busiest through streets. Strangely, it was never busy when we looked at the house...
It was very ugly inside, as these next few pictures demonstrate, but we felt we were up to the challenge and were excited to put our mark on it.
Please note: none of this furniture belongs to me :)
We fixed that house up mostly by ourselves, but the road got busier as more development happened in the eastern suburbs. In the end, we flipped it within a year.
I didn't get to enjoy that kitchen for long, but in the end, it was what sold the house on the stupidly busy street.
It was an exhausting process and we decided next time we'd do it slow. And we'd hire someone else to do all the work.
It was very ugly inside, as these next few pictures demonstrate, but we felt we were up to the challenge and were excited to put our mark on it.
Please note: none of this furniture belongs to me :)
We fixed that house up mostly by ourselves, but the road got busier as more development happened in the eastern suburbs. In the end, we flipped it within a year.
 |
| Our two youngest getting baths. It was the hottest summer on record, and we had no running water in our bathroom. |
I didn't get to enjoy that kitchen for long, but in the end, it was what sold the house on the stupidly busy street.
It was an exhausting process and we decided next time we'd do it slow. And we'd hire someone else to do all the work.
Saturday, February 12, 2011
Basement Entry
I don't know if our type of home is unique to British Columbia, but there are a lot of them here, and they were very popular about fifteen years ago.
'Basement entry' is a bit of a misnomer because we don't actually have a basement. Our house is built on a concrete slab with two stories completely above grade. You walk in on the ground floor and then up a flight of stairs to the main floor where you find most of the bedrooms plus all your living space.
The so-called basement isn't usually finished by the builder (which makes them cheaper to buy). Ours is poorly finished and the layout is choppy. But we love our neighbourhood, the kids can walk to some of the best schools in the city and our view is amazing. So instead of moving, we started thinking about what it would take to move our living space downstairs and add some bedrooms upstairs.

"If we're going to fix up the downstairs anyway, how much harder would it be to rework the layout and put our kitchen, living and dining rooms downstairs?"
Famous last words.
'Basement entry' is a bit of a misnomer because we don't actually have a basement. Our house is built on a concrete slab with two stories completely above grade. You walk in on the ground floor and then up a flight of stairs to the main floor where you find most of the bedrooms plus all your living space.
The so-called basement isn't usually finished by the builder (which makes them cheaper to buy). Ours is poorly finished and the layout is choppy. But we love our neighbourhood, the kids can walk to some of the best schools in the city and our view is amazing. So instead of moving, we started thinking about what it would take to move our living space downstairs and add some bedrooms upstairs.

"If we're going to fix up the downstairs anyway, how much harder would it be to rework the layout and put our kitchen, living and dining rooms downstairs?"
Famous last words.
Labels:
basement entry
Subscribe to:
Posts (Atom)


